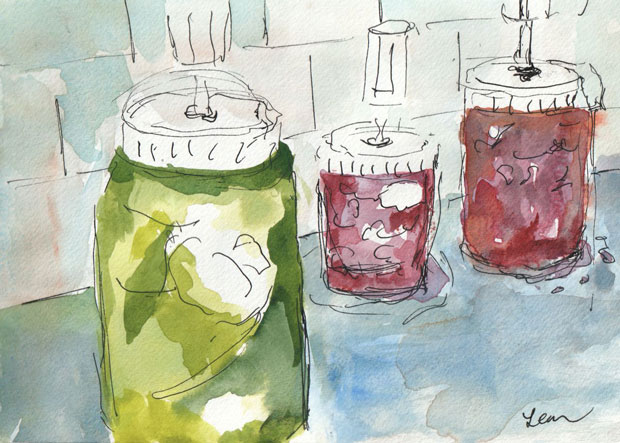
recipes

Recipe: Zucchini Stuffed with Meat

red pepper, zucchini, and lemon, watercolor on paper

If you want to cook an impressive, nutritious, and filling main course, zucchini stuffed with meat is a lovely dish. I love painting beautiful vegetables, so this recipe post is also an excuse to show off my zucchini and butternut squash watercolor paintings.

Ingredients

3 – 4 zucchini
1 lb. of chopped meat
1 tsp. coconut oil
1 tsp. cinnamon
1 tsp. nutmeg
1 tsp. cayenne pepper
1 clove chopped garlic
1/2 cup chopped mushroom
1 stalk of celery
1/4 cup chopped cilantro (or parsley)
1 lemon

Optional:
– 1 tsp. chopped turmeric root
– 1 tsp. chopped ginger root
– 1 tsp. paprika
– 1 tsp. ginger
– 1 tsp. garlic powder
– 1/2 – 1 cup of cooked rice
– herbs such as thyme or oregano

Recipe

Cut 3 zucchini in half. Then cut each zucchini lengthwise so the zucchini can be made into a boat. Scoop out the inside, being careful to leave a hull opening for later storage of the meat. Cut the scooped out zucchini into small chunks and set aside.

Take 1 lb. of chopped meat and add these spices:
1 tsp. cinnamon
1 tsp. nutmeg
1 tsp. cayenne pepper
1 clove chopped garlic
Mix and place in refrigerator for 1/2 hour or more.

Sauté onion in coconut oil for two minutes. Then mix in the spiced chopped meat.
Add these ingredients:
– the previously chopped zucchini
– 1/2 cup chopped mushroom (I use shiitake or lions mane from Zell’s farm)
– chopped celery, one stalk
– 1/4 cup chopped cilantro
– 1/2 cup cooked brown rice (optional)

Stuff in the zucchini shells. Sprinkle with juice of a lemon. Adding tomato sauce mixed with the lemon juice is optional. Bake for 1/2 hour at 400°.

Notes: if you don’t have cilantro, use parsley. It won’t have the cilantro flavor, but not everyone is crazy about cilantro anyway.

Optional: add chopped turmeric root along with the chopped garlic clove. Or chopped ginger root. See also optional spices in the ingredients list.

This recipe can be made in stages over a few days.

Variations

Butternut squash, red onion, garlic, Thanksgiving 2023, watercolor with ink on paper
One variation is stuffed butternut squash. Cook the butternut squash in the oven for 1.5 hours at 350°. Peel when it cools down. You have to cut and scoop just enough to add the chopped meat stuffing. You won’t have lots of boats like the zucchini, just 2 or 3 big stuffed shells.

You could also stuff some peppers, but I haven’t tried that version yet.

Bon appétit.

How to Ferment: Sauerkraut, Sour Tomatoes, Kimchi

ferments in my kitchen

Sauerkraut

1 head of cabbage, red or green
Save outer leaves. You can also use a horseradish leaf for top layer.

1 tsp. Real Salt (or other sea salt, Do Not Use Table Salt) — in my opinion, just add a spoonful of salt to each bunch of cut up cabbage — no need to measure exactly.

1 mason jar (32 oz. large wide mouth mason jar)
1 glass weight *
Fermentation lid for the top **

Take off and save outer leaves of the cabbage. Cut cabbage into small pieces. Place cut pieces in large ceramic bowl. Sprinkle salt as you cut. Remove from jar and place in large ceramic bowl. Massage the cabbage with a masher or with your hands. Leave it under a weight like a large water bottle and plastic plate (if you have glass or ceramic the diameter of your bowl, better) for a few hours. Object is to get the water out of the cabbage.

After some hours (can be overnight), massage the cabbage once again. Pour liquid from the cabbage into the mason jar. If you do not have a cup of water (1/4 full), add more water. Pour the water/brine into another container. Add the chopped cabbage to the mason jar. Cabbage will shrink, so put more outer leaves if it is not filling the jar. Add the optional horseradish leaf. Add the weight. Add the brine so liquid covers the cabbage. Add top fermentation lid. Place in a cool spot out of direct light. Wait as long as you can. Check every few days. Enjoy.

Sour Tomatoes

Unripened green tomatoes
Real Salt (or other sea salt)
Filtered or bottled spring water
Garlic cloves, cut out from peel (optional)
Pickling spices (optional — dill, peppercorns, mustard seed)
Horseradish leaf (optional)

1 mason jar (16 or 32 oz. large wide mouth mason jar, depending on how many green tomatoes)
1 glass weight *
Fermentation lid for the top **

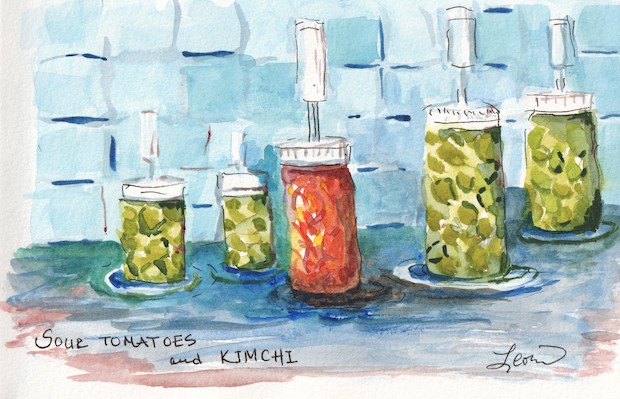
Fill a mason jar with unripe green tomatoes. Add garlic and spices. Add a few teaspoons of sea salt. Add water. If you have a horseradish leaf, place it on the top. The horseradish leaf holds the rest of the contents in place. Put the weight on top. Put on fermentation lid. In a week or less, you will see the fermentation juices bubbling up to the top. The tomatoes are often ready in about a week or two. When they turn an olive, cloudy green instead of a brighter green, you are on way to owning delicious sour tomatoes.
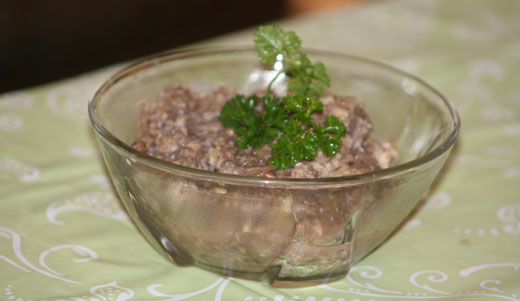
Kimchi

Real Salt (or other sea salt)
Filtered or bottled spring water
1 daikon radish
A few long red radishes (I bought some at the Jeff’s Organic stand at the Highland Park Farmers Market)
1 to 2 carrots
1 – 2 cloves of garlic
1 – 4 hot red peppery chili (or more, depending on how hot you like your kimchi)
3 Tablespoons grated or diced small ginger root
1 cabbage or horseradish leaf (optional)

1. Mix a brine of about 4 cups of water and 2 tablespoons of sea salt. Stir well to dissolve salt.
2. Coarsely chop cabbage, slice carrots into small sticks, slice radishes and daikon into small coins, and let the vegetables soak in the brine covered with a plate and a large bottle of water (or any heavy weight) for a few hours or overnight.
3. Prepare spices: chopped garlic, chili peppers with seeds removed, chopped ginger.
4. Drain off liquid from soaking vegetables into another bowl. Mix the chili, ginger, and garlic into the vegetables. Pack the mixed vegetables into a mason jar, pressing down until the brine rises. Add the cabbage leaf if you have and then a glass weight. Cover with the fermenting lid. Check every few days. Enjoy.

Adapted from Wild Fermentation by Sandor Ellix Katz

About Fermenting in General

For healing benefits, consume some of the juice of your ferments each day.

Once you have the basics down for sauerkraut or kimchi, you can try experimental combinations, such as cabbage + carrots + turnip + fresh ginger root.

Of the three recipes posted here, sour tomatoes is the easiest. You just add green tomatoes to a brine, with optional garlic or spices. But not everyone has an abundance of green tomatoes in the fall.

———-
* Glass weights: Type “fermentation glass weights” into a search engine or into Amazon, and you will find plenty. Many are less than $20. I like the ones with the little knobs, but the ones without have the advantage of taking up less space.

** Fermentation lids: look at Jillmo Fermentation kit, available on Amazon. Eden Farmhouse Essentials also makes these lids. You won’t have to burp your ferments every few days if you use these lids. Put them on and just watch as the ferment bubbles up in a few days.

ferments in my kitchen

Recipe: Creamy Egg Salad without Mayonnaise

eggs in a bowl watercolor
I have been working on a recipe for egg salad. I do not want to use store-bought mayonnaise due to the unhealthy oils in the mayonnaise. Homemade mayonnaise is too much trouble to make. So how does one make egg salad creamy?

I came up with what I call an un-recipe: I suggest the ingredients, and you decide the amounts. Just about everything is optional. Well, not the eggs. Using real salt is a good idea, too (basically, use unrefined salt, not the kind that is all white — that stuff is like eating glass). There really is a brand called Real salt that I like and was recommended to me by a friend, but you can use any kind of unrefined salt.

Ingredients:

3 – 5 hard-boiled eggs
1 soft-boiled egg (adds to the moisture and creaminess)
Real salt (unrefined)

Choose 1 or 2 or more:
Chopped celery
Chopped sweet onion
Chopped radish
Chopped pickle

Possible herbs (chop finely):
Parsley, sage, basil, dill, chervil

Wet ingredients:
Mustard, tehina, water, lemon juice, cold-pressed olive oil

Spices (optional): cumin, paprika, chili powder, turmeric (Note: I often just use salt and skip the spices).

Chop the vegetables first. Slice the hard-boiled eggs with an egg slicer (if you have one). Add the soft-boiled egg. Add the wet ingredients, the salt, and any spices. Mash it all up. Add the chopped herbs.

Especially if it is your first time making this, add the “wet” ingredients in small amounts. These combined with yolks of the eggs will make your mayo. Add more water or olive oil after the first tasting if the egg salad needs to be creamier.

Enjoy! This is a great recipe for Seudah Shlishit, the meal that observant Jews eat at the end of Shabbat.

eggs on a colorful napkin cloth watercolor

Mushroom Paté — Passover Dip

oyster mushrooms watercolor
Watercolor of oyster mushrooms purchased from the mushroom stand at the Highland Park Farmers Market


Ingredients:

  • 1 lb. mushrooms
    (I used a bag of oyster mushrooms from the Highland Park Farmers Market — marked as 1 lb.)
  • 1 large onion
  • Olive oil (or coconut oil)
  • 1/2 cup walnuts
  • 1/2 tsp. sea salt or to taste
  • Spices or dried herbs (I used dried thyme)

This mushroom paté (or mushroom dip or mushroom spread) can be made in a short time. Chop then sauté the onion in olive oil (add salt at the cooking point so it will absorbed well and not be so salty if added later). Add the mushrooms, chopped into pieces. Put the onions, mushrooms, and walnuts in the food processor, then add dried herbs. Turn on the food processor until the mixture is smooth or slightly chunky. Klara Levine, who gave me this recipe, suggested it should be the consistency of haroset.

I wrote a previous version of the mushroom paté recipe here. Enjoy Pesach to all those who celebrate – and to those of us in the Northern Hemisphere, enjoy spring.

Eggplant Dip Recipe – with Radish and Cilantro Watercolor

eggplant watercolor with radishes
Would you like to make a creamy eggplant dip, no dairy involved, with tangy flavor and chopped vegetables? Read on.

Ingredients for main dip:

  • 1 eggplant
  • 2 cloves garlic, peeled
  • 1 onion (optional)
  • 1 lemon for its juice
  • 1 Tbsp. extra virgin olive oil
  • Salt, pepper, cumin to taste
  • Fresh cilantro (you can use parsley, but it won’t be quite as flavorful)

Ingredients for salad mixins / toppings:

  • 2 or 3 red radishes, chopped small
  • 1 cucumber, chopped in cubes
  • 1 tomato, chopped in cubes (optional)
  • 2 Tbsp. chopped red onion (optional)
  • 1 chopped scallion (optional)

Bake the eggplant in a casserole dish at 375 for about 1.5 hours or until soft. Scrape out the insides into food processor. Place all the ingredients for the main dip (garlic, onion, lemon juice, olive oil, spices, cilantro) into the food processor. Blend until smooth. Before serving, add chopped vegetables: radishes, cucumber, tomato, red onion, scallion. Serve at room temperature. Enjoy!

P.S. I just bought an Instant Pot. So far, I’ve used it to make flavored rice. Maybe my next watercolor will have some of the ingredients of my rice dish. Have you bought an Instant Pot? What do you make with it?

Squash Carrot Soup – Orange and Yummy

ingredients for Butternut Squash Carrot Soup - with a leek
I’ve been making this butternut squash carrot soup a few times this fall. Learn more about its creation in the note at the bottom. If you are creative, you can serve it in a pumpkin along with a pea soup by its side. I didn’t do the pumpkin.

Squash Carrot Soup – Ingredients

  • 1 butternut squash (or one half if quite large)
  • 4 -8 carrots, peeled and cut in circles
  • 1 leek
  • 1 small onion or 1/2 large onion
  • 1 tsp. allspice
  • 1 tsp. cumin
  • salt and pepper to taste
  • olive oil or coconut oil for sauteing the onion and leek
  • A few small leaves of fresh rosemary (optional)
  • 1 tsp. chopped fresh ginger root (optional and recommended – I left it out because my daughter doesn’t care for fresh ginger, sigh)

Peel the butternut squash. If really large and you just soup for 4 people, you might consider using just half a squash. Cut in half, and pull out the seeds. Place in a pot; fill the pot with water to cover the squash. Let it cook. Meanwhile, slice and cut 4-8 carrots – even more if you have the energy. Note: this was originally a carrot soup alone – see note below. Add the carrot circles to the butternut squash with water that is cooking. Next: get a pan ready to saute the onion and leek. You can saute in olive oil or coconut oil – whatever you prefer. Chop the onion and leek finely first and add the oil to the pan. When the pan is hot (add an onion piece and watch it sizzle), add the onion bits, stir for a few minutes, and when the onion is tender, add the chopped leek. After sauteing for about 10 minutes, add the leek and onion to the pot with squash and carrots. Add the spices (allspice, cumin and ginger if using). Add a bit of chopped, fresh rosemary if using. Let the squash soup cook for about 1/2 hour. Then either use an immersion stick directly in the pot to blend the soup, or transfer the solid parts of the soup to a food processor, blend it and transfer back to the liquid. The advantage of the latter method is you can add less liquid if you want and have a thicker soup. I do the food processor method. Serve warm, although if you are quite hungry, it tastes OK room temperature, too. Enjoy!

butternut carrot squash soup

Note: this was originally just a carrot soup. My neighbor told me verbally how to make it. She had made it along with a pea soup, and she served the carrot soup along the pea soup in a pumpkin. Yes, each of us had our own pumpkin as a bowl. It was yummy – even my daughter ate it. So this soup developed because my daughter wanted a carrot soup. However, the carrots I had when I first made it were organic and thin. I would have had to have peeled at least 20 or 30 to get a substantial soup. So I changed it to a squash/carrot soup so it would stay orange. My first attempt had two leeks, not enough carrots, and turned green. Green is a fine color for a soup, but not a fitting color for a carrot soup.

Soup Reaction – What’s in Your Soup?

Have you ever made a similar soup? What ingredients did you put in? Did you use any particular cooking methods?

Tech notes: if you look at the bottom of this post, you will see a link for both the category for recipes and tags for other carrot recipes or carrot topic posts. If you click on the recipes category, you will see a list of clickable tags in all the recipe posts. Starting now, at the end of each post, I will attempt to write a little about blogging that might help some up-and-coming blogger out there.

Berry Cashew Pudding

cashew pudding with berries
Strawberry Cashew Pudding

Ingredients:

  • 1 cup strawberries or blueberries (or try some other berries or fruit)
  • 1 cup raw cashews or macadamia nuts
  • 1 pinch of sea salt
  • 1/2 tsp. vanilla extract
  • 3 Tbsp. maple syrup or honey (or to taste)

Soak the nuts for about 4 hours and drain. Blend all ingredients using food processor or blender until creamy and smooth. Serve immediately or chill. The original recipe suggests adding a little water, soymilk, or almond milk to facilitate blending if needed (I didn’t do this).

I’ve made this twice with blueberries (original recipe called for blueberries) and once last week with strawberries, as pictured.

Source: www.GetHealthyWithCarol.blogspot.com via Klara

Update in 2015: I made this again – it was delicious. This time I used frozen strawberries. Because they were frozen, my food processor took a long time to get them pureed. I then added some oat milk – that helped a lot with the pureeing process. I forgot the sea salt – I have no idea why they are in original recipe. I will ask Klara. And this time even my daughter liked this dessert – she has plans to serve it in beautiful wine glass topped with real fruit and bits of cereal (I will definitely skip that last one for me). Update on wine glasses: too tall. Next time we will try yahrzeit glasses (small little glasses of which we own an abundance). Note: the little glasses (we used yahrzeit glasses worked). Tip on using frozen fruit: let it defrost for about twenty minutes or more … that will help making the blending easier.

Mushroom Paté

Mushroom Paté with onions and walnuts

Ingredients:

  • 1/2 lb. mushrooms
  • 1 large onion
  • Olive oil (or coconut oil)
  • 1/2 cup walnuts
  • Sea salt
  • Spices or dried herbs (I used dried thyme once, fresh thyme another time – time for a thyme joke?)

Suitable for Passover or any time of the year one wants a tasty, easy to make spread, this mushroom paté (or mushroom dip or mushroom spread) can be made in a short time. Chop then sauté the onion in olive oil (add salt at the cooking point so it will absorbed well and not be so salty if added later). Add the mushrooms, chopped into pieces. Put the onions and mushrooms in the food processor, then add the salt and dried herbs. Turn on the food processor until the mixture is smooth. Add the walnuts – you can chop the nuts finely or in bigger chucks, as you prefer. Klara Levine, who gave me this recipe, suggested it should be the consistency of haroset.

Update in 2015: Klara says add the salt when sautéing the onions or mushrooms – cook salt into the food, never add at the end.

This was originally published on April 4, 2010. As an experiment, I am republishing it on April 9, 2015. Enjoy the rest of Pesach to all those who celebrate – and to those of us in the Northern Hemisphere, enjoy spring.

Chicken, Rice, Salsa in a Pot

farm chickens
Chickens at Howell Living History Farm in Mercer County, New Jersey

I was looking for a recipe I could make on Rosh Hashana (on holidays observant Jews are allowed to cook, whereas for Shabbat we do all the cooking in advance). I found a recipe called Shabbat in a Pot in the cookbook The Taste of Shabbos. It was delicious, so I repeated it and changed it a bit. Here is my new culinary creation (a chicken rice salsa combination – the new ingredient is salsa – the old recipe used tomato paste and soy sauce, if you prefer that combination).

Ingredients

  • 4 – 7 pieces of chicken
  • 1 zucchini – chopped
  • 1 onion – chopped
  • 2 -3 cloves of garlic
  • 1 peeled and chopped carrot
  • 1 tsp. olive oil (or enough to coat the bottom of your pot)
  • 1 cup of brown rice
  • 1 1/2 cup of water (maybe more)
  • 1/4 – 1/2 cup of salsa
  • Black pepper to taste
  • Optional (but delicious if you have them): fresh parsley, sage and/or rosemary, chopped
  • Optional (if fresh is not available): dried rosemary and/or oregano

How to Make the Chicken Rice Salsa Dish

Use a pot with a somewhat wide bottom (mine was about 7 inches wide at the bottom and 5 inches tall). Heat the oil, then saute the vegetables (onions first, then garlic cloves, carrots and zucchini) until tender. Add the rice, then the chicken. Add salsa, pepper and any dried herbs. Cook for about one hour (until rice is cooked). In the last fifteen minutes, be sure to stir the bottom often, to make sure it doesn’t burn at the bottom and the rice is evenly cooked. Toward the end of the cooking, add fresh herbs if you have any. You may need to add a little more water if all has already been absorbed and the dish needs more cooking.

Warning: do not leave this dish once it is cooked on even medium heat for too long. I left it on low medium heat, and the bottom got burnt. If you are doing this right before Shabbat, you can do something called hatmana: wrap it in an old blanket and unwrap right before serving. This is a way of insulating your food without fire or electric heat. Or use a warming tray that provides only a little bit of heat.

• • •

In other news, Pinterest kept sending me emails about signing up for a business account. I finally agreed out of curiosity. One benefit is you get statistics. So it turns out that my most popular pin last month on Pinterest with a leoraw.com url is Rosh Hashana Recipes. I doubt this will help much with my business (I build small business websites), but it is interesting to note what gets re-pinned and increases traffic.

We have one more set of holidays (Shemini Atzeret/Simhat Torah, where we dance with the Torah); a week or two after those holidays, I plan to resume Websites for Small Biz blogging (with an upcoming section on category pages). As for today – it is still Sukkot, so Moadim L’Simcha to all those who celebrate.

Fermented Daikons – Daikon Pickles

fermented daikon radishes
If you want to know what a daikon, a long white radish, looks like, see the bottom of this post.

Earlier this summer the organic stand at the local farmers market was selling daikon radishes. I bought one and made fermented daikons. They are easy to make – you just need salt, water, a jar with a wide opening and a baby food jar. Some people buy special fermenting jars. I’ve been pickling for about three years, and I haven’t had the need to buy one.

Don’t have a daikon? If you have local produce, I bet there is something there you could pickle!

Ingredients and Equipment

  • 1 daikon
  • 1 tbsp. sea salt
  • enough water to cover the daikon
  • 1 wide-mouthed jar (I use canning jars)
  • 1 baby food jar
  • 1 thin, clean cloth
  • 1 rubber band

How to make fermented daikons (daikon pickles)

Cut daikon into slices. Place in jar along with sea salt. Cover with water. Put baby food jar into the canning jar. You need to make sure the daikon slices are floating under the water. You don’t want to expose them to the air. Cover the jar with a cloth and a rubber band to hold the cloth in place.

Put the daikon in brine (sea salt water) in a corner of your kitchen where you won’t forget it. You don’t want it in the refrigerator, or else it won’t ferment. In my kitchen in the summer it usually takes a week for it to taste like a pickle. If you have never fermented before, check it every day after the first three days to see if you think it is ready (you can take a taste of the water or a slice to taste test).

When you do think it is ready, put it in the refrigerator. Serve the pickles at room temperature. Enjoy!

daikon radish

This post was written so I would have something to submit to Batya’s next edition of the Kosher Cooking Carnival.

<<