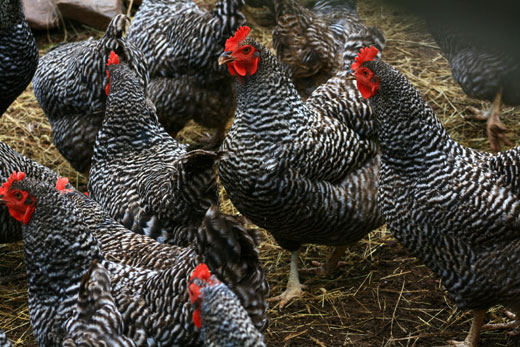
Chickens at Howell Living History Farm in Mercer County, New Jersey
I was looking for a recipe I could make on Rosh Hashana (on holidays observant Jews are allowed to cook, whereas for Shabbat we do all the cooking in advance). I found a recipe called Shabbat in a Pot in the cookbook The Taste of Shabbos. It was delicious, so I repeated it and changed it a bit. Here is my new culinary creation (a chicken rice salsa combination – the new ingredient is salsa – the old recipe used tomato paste and soy sauce, if you prefer that combination).
Ingredients
4 – 7 pieces of chicken
1 zucchini – chopped
1 onion – chopped
2 -3 cloves of garlic
1 peeled and chopped carrot
1 tsp. olive oil (or enough to coat the bottom of your pot)
1 cup of brown rice
1 1/2 cup of water (maybe more)
1/4 – 1/2 cup of salsa
Black pepper to taste
Optional (but delicious if you have them): fresh parsley, sage and/or rosemary, chopped
Optional (if fresh is not available): dried rosemary and/or oregano
How to Make the Chicken Rice Salsa Dish
Use a pot with a somewhat wide bottom (mine was about 7 inches wide at the bottom and 5 inches tall). Heat the oil, then saute the vegetables (onions first, then garlic cloves, carrots and zucchini) until tender. Add the rice, then the chicken. Add salsa, pepper and any dried herbs. Cook for about one hour (until rice is cooked). In the last fifteen minutes, be sure to stir the bottom often, to make sure it doesn’t burn at the bottom and the rice is evenly cooked. Toward the end of the cooking, add fresh herbs if you have any. You may need to add a little more water if all has already been absorbed and the dish needs more cooking.
Warning: do not leave this dish once it is cooked on even medium heat for too long. I left it on low medium heat, and the bottom got burnt. If you are doing this right before Shabbat, you can do something called hatmana: wrap it in an old blanket and unwrap right before serving. This is a way of insulating your food without fire or electric heat. Or use a warming tray that provides only a little bit of heat.
• • •
In other news, Pinterest kept sending me emails about signing up for a business account. I finally agreed out of curiosity. One benefit is you get statistics. So it turns out that my most popular pin last month on Pinterest with a leoraw.com url is Rosh Hashana Recipes. I doubt this will help much with my business (I build small business websites), but it is interesting to note what gets re-pinned and increases traffic.
We have one more set of holidays (Shemini Atzeret/Simhat Torah, where we dance with the Torah); a week or two after those holidays, I plan to resume Websites for Small Biz blogging (with an upcoming section on category pages). As for today – it is still Sukkot, so Moadim L’Simcha to all those who celebrate.
If you want to know what a daikon, a long white radish, looks like, see the bottom of this post.
Earlier this summer the organic stand at the local farmers market was selling daikon radishes. I bought one and made fermented daikons. They are easy to make – you just need salt, water, a jar with a wide opening and a baby food jar. Some people buy special fermenting jars. I’ve been pickling for about three years, and I haven’t had the need to buy one.
Don’t have a daikon? If you have local produce, I bet there is something there you could pickle!
Ingredients and Equipment
1 daikon
1 tbsp. sea salt
enough water to cover the daikon
1 wide-mouthed jar (I use canning jars)
1 baby food jar
1 thin, clean cloth
1 rubber band
How to make fermented daikons (daikon pickles)
Cut daikon into slices. Place in jar along with sea salt. Cover with water. Put baby food jar into the canning jar. You need to make sure the daikon slices are floating under the water. You don’t want to expose them to the air. Cover the jar with a cloth and a rubber band to hold the cloth in place.
Put the daikon in brine (sea salt water) in a corner of your kitchen where you won’t forget it. You don’t want it in the refrigerator, or else it won’t ferment. In my kitchen in the summer it usually takes a week for it to taste like a pickle. If you have never fermented before, check it every day after the first three days to see if you think it is ready (you can take a taste of the water or a slice to taste test).
When you do think it is ready, put it in the refrigerator. Serve the pickles at room temperature. Enjoy!
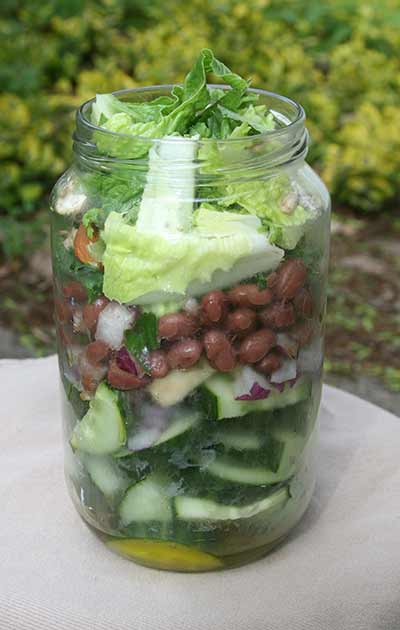
Summer approaches: more opportunities to take food on the go. What do you eat when you travel? Have you ever made salad in a jar?
Last week I drove to U. of Maryland and back to pick up my son. I made my salad in a jar the day before. The only “rules” are put the green leafy vegetables like lettuce on the top, and have the dressing on the bottom. Then, when you are ready to eat, tip over the jar so the dressing runs all through the ingredients. Make sure to bring a fork and plate. It is difficult to eat salad in a jar if you don’t have a desk or table handy. Next time I travel maybe I will try a plastic bowl for the salad (not for storing it, just for eating it).
First, I will list the ingredients in my salad in a jar. Then I will make a list of all sorts of ideas of what one can put in the jar. Feel free to add your own food ideas in the comments.
Ingredients for One Version of Salad in a Jar
romaine lettuce – torn into pieces
raw kale – torn into pieces
bits of sunflower seeds, pumpkin seeds, chopped nuts
bean salad – I had a leftover bean salad I had made for Shabbat. It already had a light, garlicky dressing and bits of red onion and fresh oregano.
cucumber – chopped into pieces
dressing – olive oil, raw apple cider vinegar (add a few spices and salt/pepper to taste)
glass jar with wide top
fork and plate or bowl for eating
Make the Salad
Find a jar with a wide top. Locate all your ingredients and assemble them. If you don’t have enough ingredients, go to the store, walk through the produce section, and pick out some vegetables! Fruit might work, too. In my case, I chopped up cucumbers and a few red onions. I washed romaine lettuce and kale. I had already made a bean salad the day before.
My first layer is the dressing. I used only cold pressed olive oil and a tablespoon of apple cider vinegar. But in retrospect, a few spices might have been nice (salt, pepper, garlic powder, turmeric are possibilities). Then I added the chopped cucumbers. It is best to add heavy vegetables such as cucumbers, steamed cauliflower, or steamed brussel sprouts – something substantial that the rest of the salad can “sit” upon.
Then I sprinkled my chopped red onion. The bean salad went on top of that, followed by the kale and on top the romaine lettuce. I sprinkled some sunflower seeds and nuts on the top. I did have a hard boiled egg that I took on the side.
When you get to your destination, it is best to have a table or desk upon which to eat the salad. Be sure to take a fork! Turn the jar upside down so the dressing runs all over the lettuce. Put the salad on the plate, and enjoy. You may find this more than you can eat – it would be nice to share with a friend.
Comparison to a sandwich: it is much easier to eat a sandwich on the go. However, I much prefer the taste of this salad in a jar. And my body prefers it as well.
Long List of Ideas for Salad in a Jar
Lettuces: romaine, red leafy, green leafy, all kinds of leafy!
Greens: kale, spinach, watercress – it would be interesting to try some lightly cooked greens in the middle (you may not want it to touch the lettuces until serving time).
Hard boiled eggs (I stored mine separately)./li>
Hard cheese
Seeds – sunflower, pumpkin, chia seeds
Nuts – you may want to be careful about nuts because of the chocking hazard. Even an adult can choke – don’t move around when you eat.
Cucumbers
Beets – cooked, uncooked and sliced, fermented – but be aware you may end up with pink salad.
Turnips, Parsnips, chopped, shredded carrots
Cauliflower, brussel sprouts, broccoli – I would want them lightly-steamed
One of my favorite foods to eat on Pesach (Passover) is matza brei (that’s bri with a long i as in sky or apple pie). Here is the basic, basic recipe:
Ingredients
1 piece of square matza (can be regular, whole wheat or any other kind)
1 egg
1 or two pats of butter
Equipment
1 bowl
1 fork
1 frying pan
Take the egg. Crack it into the bowl. Stir. Crack matza into pieces, large or small matza pieces (your choice). Let matza soak (this is sort of like French toast, except unleavened). Put a pat of butter in the frying pan. Heat butter until it bubbles. Add egg-matza mixture. Cook a minute, stir, flip and cook the other side. Use the other pat of butter if necessary. When the egg is cooked but not too much, slide the matza brei unto a plate. Enjoy. Eat with a glass of orange juice, a cup of tea or coffee or plain water if you like.
Variations of Matza Brei
As my friend Larry reminded me when I posted my matza brei photo with short recipe on Google+, there are multiple varieties to this egg-y treat. I decided a fun addition to this post would be to list as many variations as I could think here; feel free to add your own in the comments.
Plain– plain is more or less as I posted it. Good if you are in a rush or you really do prefer plain. I like plain.
Salty – salty would be adding salt and maybe pepper, too.
Savory – I looked up savory, and it seemed to be defined by adding rosemary or thyme. I will include in this options like parsley, dill, scallions, onions, mushrooms and garlic. Of course, you might combine savory with salty as in herbs with salt and pepper.
Sweet – sugar is a common way to make sweet. You could do cinnamon sugar or add raisins. You could eat the cooked matza brei with jam (I would go for this one, as I like the sweet fruit kind).
Spicy – I’m adding another section to include cumin, coriander, turmeric, salsa, hot pepper or other spicy treats.
Note: not all observant Jews eat matza brei on Pesach. Some Jews do not eat grebrokhts, that is, matza dipped in a wet substance. My family tradition is to eat plenty of matza brei.
What do you prefer: plain, salty, savory or sweet? Or spicy or something else all together? Creamy? How would you prepare this dish?
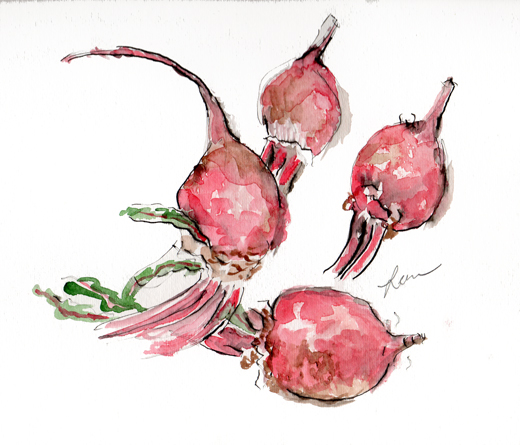
Beets, watercolor and ink pen on paper by Leora Wenger, January 2014
Beets and early spring: do you associate the two? In any case, I’ll teach you how to make fermented beets. You only need two food ingredients: a bunch of beets and some salt. We won’t be cooking the beets, although I did find recipes that cooked the beets before fermenting. Cooking might make it easier to digest, but it also might kill off some of the nutrients. And I like the crunch of raw beets. You will also need a sharp knife, a cutting board, a glass jar (a mason jar is fine), a small baby food jar, a piece of thin cloth and a rubber band.
Ingredients
3 or 4 beets
2 tsp. sea salt
water
Wash the beets as best you can and cut off the ends (the part with the leaves and the part that looks like a tail). Cut each beet in half once and slice as thin as you can. Place the beets in a glass jar with a wide top. Add sea salt. Add enough water to cover the beets. Place a small jar on top of the beets to push them down into the brine. The beets need to be submerged in water. Cover the jar with a thin cloth and hold the cloth in place with a rubber band. Wait about two weeks. Fermented beets! In the heat of the summer, you may only have to wait two days instead of two weeks. If you are fermenting for the first time, you should check it every few days to see how the flavor changes. Really, you should do that whenever you ferment, but in reality you might just move on to other things. If you feel your beets are done fermenting, store them in the refrigerator.
You can even drink the liquid – I believe it is called beet kvass. I mix mine with a bit of seltzer.
Enjoy these easy-to-cook, delicious curried beans. You can adjust the flavorings as you like.
1 cup cooked beans (I found one cup uncooked beans, after cooking, made about two cups cooked) or 1 can of beans
1 tsp. coconut oil
tsp. chopped ginger root (cut off the peel first, then chop the ginger into little squares)
2 cloves of garlic, chopped
1/2 tsp. turmeric
1/2 tsp. cumin
1/2 tsp. coriander
salt and pepper to taste
optional: 1 tsp. chopped onion
optional: 1 or 2 carrots, chopped into little circles or into tiny squares
optional: a piece of kombu or wakame (seaweed)
garnish with parsley, coriander, basil or your favorite fresh herb
Soak the beans overnight. I’ve used great northern beans (a small white bean) and red beans; I’ve also cooked both together. I’m sure other beans will work as well, as long as they are not too small and not too mushy when cooked. Discard the soaking water, add new water and cook until the beans are tender. For added nutrients and flavor, add a piece of kombu or seaweed while the beans are cooking. You can also add salt.
When the beans are ready, you can store them in the refrigerator for cooking later, if you are not quite ready to make the recipe.
Heat the coconut oil in a wide pan. I have a wok-like pan for this sort of cooking. When heated, add the spices and stir. Add the chopped ginger and garlic (onion if using – wait five minutes and add carrots if using). Stir and cook for five minutes. Drain any excess water from the beans and add to the pan. Cook for about ten minutes or until warm. Serve warm or room temperature with your favorite herb garnish. Tastes great with rice, pasta or whatever else you are serving (probably not with ice cream, but maybe vanilla ice cream).
• • •
Here is an interesting article about the quality of Costco’s coconut oil. The blog writer interviews the VP of Carrington Farms and the VP says, among other noteworthy responses, “the low price of the oil at Costco is simply a matter of the economy of scale.”
Bake the acorn squashes whole until they are easier to cut in half. After about twenty minutes of baking, cut them in half. Continue baking until the squash is soft – you can test it with a fork. It took a little over an hour in my oven at 350°. Peel and cook the yam(s) in enough water to cover. Peel the garlic cloves, and cut off the ginger root peel. Cut the ginger root into little pieces. After about 15 minutes of cooking, add the garlic cloves and chopped ginger root. When both the yam(s) and garlic cloves are soft, remove them from the heat and cooked water (I used a slotted spoon). Mash in a bowl, and add salt, pepper and a fresh, chopped herb (I happen to have basil from my garden). Pile scoopfuls of this orange mixture into your baked squashes. Warm before serving.
On the one hand, this recipe takes a while to make because you have to bake the acorn squashes first. On the other hand, you can do it when you already have the oven going, and you can do it a day before you plan to serve the stuffed squash with yams. It’s an easy recipe.
This recipe for cucumber garlic salad is an adaption of a recipe from Mama Nazima’s Jewish Iraqi Cuisine cookbook by Rivka Goldman. It is the only Jewish Iraqi cookbook I have read, and the recipes seem simpler than those of, say, Jewish Syrian cuisine. Rivka Goldman was born in Basra, Iraq and now lives in the U.S. Her recipe does not have cilantro or basil; I added basil because I have some in my garden, and I like the basil flavor with cucumbers.
I have had quite a few cucumbers this summer as I am growing them in my front and backyards. My plan had been to make them into pickles, but they usually grow too big so I have been enjoying this cucumber salad and Israeli-style cucumber/tomato salads as well.
Ingredients
3 large cucumbers, peeled and sliced
2-3 chopped garlic cloves
1/4 cup chopped parsley, cilantro and/or basil
1/4 cup chopped fresh mint
Juice of 1/2 lemon
1 tsp. olive oil
black pepper and salt to taste
Combine all the ingredients in a bowl. Toss and chill a few hours before serving. Enjoy.
I enjoy beets. Beets can make food a bright, natural pinkish red. I once used beet juice to color icing on a birthday cake – it was beautiful, and no one except my daughter and I knew how we got that lovely shade of pink. Here are two delicious ways to prepare beets, and then I threw in a bonus “beet soda” to cool you off on a hot summer day. Hope you enjoy these beet recipes.
Lemon Beet Salad
An easy classic way to prepare beets.
Ingredients:
3 beets
1 lemon
salt and pepper to taste
first cold pressed olive oil
fresh parsley for garnish
Cover the beets in a saucepan with water, and cook until the beets are tender (use a fork to test). It usually takes about an hour to cook the beets. Remove the beets from the beet juice (you can use the beet juice to make beet soda as described in the bottom recipe). Peel the skin off the beets. Chop into bite-sized slices. Sprinkle with sea salt, olive oil, pepper and a fresh lemon juice. Garnish with parsley, cilantro, basil or whatever fresh green herb you have available. Tastes nice at room temperature.
• • •
Fermented Sliced Beets
You have to make these a week in advance, but then you have tasty pickled beets to serve for several meals.
Ingredients:
3 beets
1 Tbsp. sea salt
water to cover
Wash beets carefully. While still raw (no cooking in this recipe), chop in half or quarters and then into thin slices. Put the beets in a glass jar. Add a tablespoon of sea salt. Cover with water. To weigh down the beets and make sure the brine covers them, I use a baby food jar. Cover the glass jar with a cloth and a rubber band. In a few days, it will begin to ferment (you will see small bubbles on top). You can taste the beets as you go along. In about a week, store them in the refrigerator. Serve at room temperature.
• • •
Beet Soda
Save the beet juice from either of the above recipes. Add seltzer, maybe a twist of lemon or lime, maybe a cube of ice, and enjoy!
• • •
Do you cook with beets? What are your favorite beet recipes?
I often make more brown rice than I need, so I was inspired to create a rice salad to use up my leftover rice. There was a recipe for a crunchy vegan rice salad in a Molly Katzen cookbook that I had made long ago. I didn’t reconsult her cookbook to work on this recipe, but I had some of idea of what I wanted to attain based on her sweet and sour crunchy rice salad recipe.
Ingredients
1 cup cooked rice (you can certainly use more – just use more of the other ingredients)
1 zucchini, chopped into half moons, sauted in coconut oil (I’ve tried it with olive oil – I strongly prefer the coconut oil)
1 handful sunflower seeds (you can also try cashews, slivered almonds, pumpkin seeds and/or sesame seeds)
1/2 cup orange juice or juice of 1 orange (or a combination of both)
1 tsp. tamari sauce
1/2 tsp. sesame oil
2 chopped red radishes (or chop up a red pepper – the idea is to get the color red – you could also try chopped carrots)
1 handful chopped fresh parsely (or cilantro)
3 chopped scallions
How to Make the Rice Salad
Assuming you already have cooked rice, coat the rice with olive oil. Add sesame oil, tamari and orange juice. Saute the zucchini (chopped into half circle shapes) until tender. Add chopped radish, seeds and chopped parsley. Toss together. Refrigerate and serve one day later.
About the Crunchy Vegan Rice Salad Recipe
This recipe can be altered as you please. The idea is to add sweet, salty and sour flavors to a grain. Toss in crunchy foods, and you have a delicious, healthy salad. What would you add to a rice salad?
Thank you to everyone who responded to my images of rice salad. Appreciate the feedback.